Wednesday, 26 November 2014

How to add same column data with separated by special character in informatica?

Suppose the source table has values like this
10 X
10 Y
10 Z
20 A
20 B
20 C
30 P
30 Q
30 R
And the target should be
10 X*Y*Z
20 A*B*C
30 P*Q*R 

How will you do the mapping?
Answer: This can be done using an expression transf and Aggregator transf.

In expression transf declare 2 variables ID_V and NAME_V
NAME_V
IIF(ID_V=ID,NAME_V ‘ * ‘ NAME,NAME)
ID_V
IIF(ID_V!=ID,ID,ID_V)
NOW pass the output ports to aggregator GROUP BY ID and connect to target.


Thanks
Hari

how to write a sql query for Number of working days between any 2 given dates.?

The working days means count of days other then Saturdays and Sundays. Let us take the given 2 dates as ’dd-mm-yyyy′ and SYSDATE.
and your result will be look like 
select count(val) Number_of_working_days from
(
select
to_number(to_char(to_date(’dd-mm-yyyy′)+rownum , ’D')) val,
to_char(to_date(’dd-mm-yyyy′)+ rownum) date1,
to_char(to_date(’dd-mm-yyyy′) + rownum, ‘Day’) day1
from
all_objects
where
to_date('dd-mm-yyyy')+rownum<= sysdate
)
where val not in (6,7)
Thanks
Hari


How to Concate multiple fields from the source table as comma separated values into a field in the target table.

Ex:suppose i have a file like

Name,Dno,Address
XXX,IT,bangalore,Karnataka,India
YYY,BPO,chenai,tamilnadu,india
ZZZ,HR,Pune,Maharasta,India

Here delimiter is “,”(comma) and if we look into address column we have multiple delimiters those need to load into same column in target.
same example we can see below


Below is the script for EMPLOYEE_SKILLS as source table:


CREATE TABLE EMPLOYEE_SKILLS
(EMP_ID NUMBER(10),
EMP_NAME VARCHAR2(30),
EMP_SKILL1 VARCHAR2(40),
EMP_SKILL2 VARCHAR2(40),
EMP_SKILL3 VARCHAR2(40));

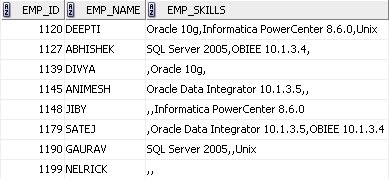
The data available in the EMPLOYEE_SKILLS table is shown below:


Below is the script for EMPLOYEE_SKILL_SUMMARY target table:

CREATE TABLE EMPLOYEE_SKILL_SUMMARY
(EMP_ID NUMBER(10),
EMP_NAME VARCHAR2(30),
EMP_SKILLS VARCHAR2(120));

The data from EMP_SKILL1, EMP_SKILL2 and EMP_SKILL3 columns of EMPLOYEE_SKILLS table should be concatenated as comma separated values into the EMP_SKILLS column of the EMPLOYEE_SKILL_SUMMARY table.

The mapping shown above is the earlier mapping which concatenated all the skill Input port values in the EMP_SKILL_OUT Output port in the EXP_CONCAT_SKILLS Expression Transformation. The expression used in the EMP_SKILL_OUT port is shown below.


The issue surfaced after the data was loaded in the target table. Below are the records loaded into the EMPLOYEE_SKILL_SUMMARY table.


Now, the EMP_SKILLS field was displayed in some analytical reports and the way the data showed up didn’t look very pleasing. For instance, EMP_ID = 1199 has no skills in the EMPLOYEE_SKILLS source table, so when the three input port values were concatenated in the expression transformation, the data displayed in the reports was ',,'. So, a logic needed to be implemented that took care of NULL values and didn’t add a ‘comma’ for the NULL values. 

The new logic is discussed below.


Instead of concatenating all the EMP_SKILL1_IN, EMP_SKILL2_IN and EMP_SKILL3_IN port values together, the new logic checked if the Input Skill values in the ports EMP_SKILL1_IN and EMPSKILL2_IN were having NULL values. If it is a NULL value, it will pass a blank string as '', else it would concatenate the incoming value with a ‘comma’ in the variable ports EMP_SKILL1_V and EMP_SKILL2_V.

The EMP_SKILLS_CONCAT_V variable port will concatenate values from the variable ports EMP_SKILL1_V, EMP_SKILL2_V and the input port EMP_SKILLS3_IN.

Now, the only problem of a ‘comma’ occurring at the end of the concatenated string will be in a scenario when EMP_SKILL2_IN and EMP_SKILL3_IN values are NULL or when EMP_SKILL3_IN values is NULL. For instance, if we observe in the source table EMPLOYEE_SKILLS, for EMP_ID = 1127, the EMP_SKILL1 and EMP_SKILL2 columns have valid data. So, for this particular record, the EMP_SKILLS_CONCAT_V port will have the string value as ‘SQL Server 2005,OBIEE 10.1.3.4,’. At the end of the string, the extra comma gets added as well. 

To eliminate this ‘comma’, the string in the variable port EMP_SKILLS_CONCAT_V is reversed in the variable port EMP_SKILLS_REVERSE_V. The EMP_SKILLS_REMOVE_COMMA_V variable port will check for the occurrence of a ‘comma’ at the start of the data string. If it encounters a comma, it will pass only the substring without the ‘comma’ at the start of the string, else it passes the data as it is. This is achieved with the expression as shown below.


Now, to get back the original concatenated string without any extra ‘comma’ , reverse the data again and pass it through the EMP_SKILLS_OUT output port to the final target table column EMP_SKILLS.

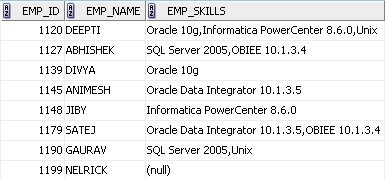
These are the records in the EMPLOYEE_SKILL_SUMMARY table after running the modified mapping again.

Thanks
Hari

Informatica PowerCenter 9 Installation and Configuration process.

This guide provides complete step by step instruction for installation and configuration of Informatica PowerCenter 9.x. This includes  the installation of server components, configuration of different Informatica services and client installation and configuration.
    • Install Informatica PowerCenter Server.
    • Domain Configure.
    • Configure Repository Service.
    • Configure Integration Service.
    • Client Installation.
    • Installation Known Issues and Solution.

INSTALL INFORMATICA POWERCENTER SERVER

Step : 1

To locate install.exe, Navigate to D:\INFA9X\dac_win_101314_infa_win_32bit_910 as shown in below image. double click on the install.exe. 
Informatica 9 Installation Steps
Step : 2
Installation wizard Starts.  Choose the installation type.
Click Next.
Informatica 9 Installation Steps
Step : 3
Installation Pre-requisites will be shown before the installation starts as below.
Click Next. 
Informatica 9 Installation Steps
Step : 4

Enter the license key. You can locate the license key from D:\INFA9X\EXTRACT\Oracle_All_OS_Prod.key.
Click Next.
Informatica 9 Installation Steps
Step : 5

Pre-installation summery will give the items installed during the installation process based on the license key.
Click Next
Informatica 9 Installation StepsStep : 6
Installation Begins. It takes couple of minutes to finish. Soon after completion of this step, Configuring Domain window opens. Continue the steps from Domain Configuration.
Informatica 9 Installation Steps

DOMAIN CONFIGURATION.

Step : 1
    • Choose “Create a Domain” radio button.
    • Check “Enable HTTPS for Informatica Administrator”
    • Leave the Port number as it is and choose “Use a keystore file generated by the installer”
Click Next.
Informatica 9 Installation Steps
Step : 2
Provide the Repository database details as below.

    • Database Type : Choose your Repository database (Oracle/SQL Server/Sybase)
    • Database user ID : Database user ID to connect database.
    • User Password  : Password.
    • Schema Name : If Schema name is not provided default schema will be used.
    • Database Address and Port : Machine on which database in installed and default port number.
    • Database Service Name :  Database Name.
Below image shows the configuration using SQL Server.
Click Next.
Informatica 9 Installation Steps
Step : 3
You can give the Domain details, Admin user details now.

    • Domain Name : Name of your Domain.
    • Node Host Name : Machine name on which Informatica Server is running.
    • Node Name : Name of the Node.
    • Node Port Number : Leave the default port Number.
    • Domain user name : This is the Administrator user
    • Domain password : Administrator password
Note : Remember your Admin User ID, Password to log on to Admin Console later in the installation.Informatica 9 Installation StepsStep : 4
Use the default configuration and Click Next.
Informatica 9 Installation Steps
Step : 5
Installation is complete and you get the post-installation summery. You get a link to the installation log file and a link to Admin console.
Click Done.
Informatica 9 Installation Steps

CONFIGURE REPOSITORY SERVICE

Step : 1
Go to Start menu and Click on “Informatica Administrator Home Page”. This will open up the Admin Console in a web browser.
Informatica 9 Installation Steps
Step : 2
Log on to Admin console using your Admin User ID and Password. You set your Admin User ID and Password in “Domain Configuration” section Step 3
Informatica 9 Installation Steps  
Step : 3
Once you Log on you will see the Screen just like shown below.
Informatica 9 Installation Steps
Step : 4
Choose your Domain Name from “Domain Navigator”, Click on “Actions”, Choose “New” and “PowerCenter Repository Service”.
Informatica 9 Installation Steps
Step : 5
A new screen will appear, Provide the details as shown below.
    • Repository Name : Your Repository Name.
    • Description :  An optional description about the repository.
    • Location : Choose the Domain you have already created. If you have only one Domain, this value will be pre populated.
    • License : Choose the license key from the drop down list.
    • Node : Choose the node name from the drop down list.
Click Next.
Informatica 9 Installation Steps
Step : 6
A new screen will appear, Provide the Repository database details.

    • Database Type : Choose your Repository database (Oracle/SQL Server/Sybase)
    • Username : Database user ID to connect database.
    • Password : Database user Password.
    • Connection String : Database Connection String.
    • Code Page : Database Code Page
    • Table Space : Database Table Space Name
    • Choose “No content exists under specified connection string. Create new content”
Click Finish
Informatica 9 Installation Steps
Step : 7
It takes couple of minutes create Repository content. After the repository creation below screen will be seen. 
Informatica 9 Installation Steps
Step : 8
The repository service will be running in “Exclusive” mode as shown below. This needs to be change to “Normal” before we can configure Integration service.
Click “Edit” Repository Properties.
Informatica 9 Installation StepsStep : 9
A pop up window appears, Set the properties

    • Operation Mode : Normal
    • Security Audit Trail : No
Click OK.
Click OK for the next two pop up windows which confirms the Repository Restart to change the Repository Operating Mode.
Informatica 9 Installation Steps

CONFIGURE INTEGRATION SERVICE

Step : 1
Choose your Domain Name from “Domain Navigator”, Click on “Actions”, Choose “New” and “PowerCenter Integration Service”.
Informatica 9 Installation Steps
Step : 2
A new window will appear, Provide the details as shown below.

    • Name : Your Integration Service Name.
    • Description :  An optional description about the repository.
    • Location : Choose the Domain you have already created. If you have only one Domain, this value will be pre populated.
    • License : Choose the license key from the drop down list.
    • Node : Choose the node name from the drop down list.
Click Next.
Informatica 9 Installation Steps
Step : 3
A new window will appear, Provide the details as shown below.

    • PowerCenter Repository Service : Choose your Repository Service Name from the drop down list.
    • Username :  Admin user name.
    • Password : Admin password.
    • Data Movement Mode : ASCII.
Click Finish.
Informatica 9 Installation Steps
Step : 4
A pop up window will appear, Choose the Code Page as ANSI.
Click OK.
Informatica 9 Installation Steps
Step : 5
Window will be closed and you can see all the configured services in the “Domain Navigator”
Informatica 9 Installation Steps
With that we are all done with the installation and configuration for Informatica PowerCenter Server.

CLIENT INSTALLATION.

Step : 1
Go to D:\INFA9X  as shown in below image. Click on the install.bat. 

Informatica 9 Installation Steps

Step : 2
Installation wizard Starts.
Click Start.
Informatica 9 Installation Steps
Step : 3
Installation wizard Starts.  Choose the installation type as in the below image.
Click Next.
Informatica 9 Installation Steps
Step : 4
Installation Pre-requisites will be shown before the installation starts as below.
Click Next. 
Informatica 9 Installation Steps
Step : 5
Choose the client tools you need. Only PowerCenter  Client is mandatory.
Click Next. 
Informatica 9 Installation Steps
Step : 6
Choose the client installation directory.
Click Next. 
Informatica 9 Installation Steps
Step : 7
You can choose the type of Eclipse installation in this step. This window will be available if you choose to install “Informatica Developer” or “Data Transformation Studio”.
Click Next. 
Informatica 9 Installation Steps
Step : 8
Pre-installation summery will give the items installed during the installation process.
Click Next.
Informatica 9 Installation Steps
Step : 9
Installation Begins. It takes one or two minutes to complete this step. 
Informatica 9 Installation Steps
Step : 10
Installation is complete and you get the post-installation summery. 
Informatica 9 Installation Steps

                                                               Done.

Thanks
Hari

Tuesday, 25 November 2014

What are the main issues while working with flat files as source. Can we perform scd - 2 on flat file sources?

No,we can't perform type-2 on flat files because

1. We can not use SQL override. We have to use transformations for all our requirements
2. Testing the flat files is a very tedious job
3. The file format (source/target definition) should match exactly with the format of data file. Most of the time erroneous
result come when the data file layout is not in sync with the actual file.
(i) Your data file may be fixed width but the definition is delimited----> truncated data
(ii) Your data file as well as definition is delimited but specifying a wrong delimiter (a) a delimitor other than present in
actual file or (b) a delimiter that comes as a character in some field of the file---
>wrong data again
(iii) Not specifying NULL character properly may result in wrong data
(iv) there are other settings/attributes while creating file definition which one should be very careful
4. If you miss link to any column of the target then all the data will be placed in wrong fields. That
missed column wont exist in the target data file.


Thanks
Hari